
2. Place a photo into the document. For this illustration, I'm using a tightly-cropped square portrait. Uncheck the Link button, in the Place dialog, so the photo will be embedded. If you forget this step, simply go to the Links panel and embed the image.

3. Make sure the photo is 400 pixels by 400 pixels. If necessary, you can resize it in the Control Panel. The beauty of this technique is that you can start with a less-than-perfect photo and get a nice result.

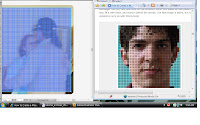
4. With the image selected, go to Object > Create Object Mosaic.
5. Enter one tenth the size of the full image in the Number Of Tiles section.

Since the image is 400 pixels by 400 pixels, the number of tiles will be 40 and 40. Check Delete Raster in the Options section.
6. Ungroup the mosaic. You should be able to select individual squares. Now go to Effect > Convert to Shape and choose Ellipse...
6. Ungroup the mosaic. You should be able to select individual squares. Now go to Effect > Convert to Shape and choose Ellipse...

7. In the Shape Options dialog, enter 10 pixels for the Width and Height (400 pixels by 400 pixels, divided by 40 rows and columns). That's it, you're done!
8. For added touch, use Rectangle Tool, click once on the artboard, 400 pixels by 400 pixels for the size, fill it with black, and send it behind the mosaic.
http://vector.tutsplus.com/tutorials/illustration/how-to-create-a-mosaic-portrait-from-a-photograph/
.html
.html

No comments:
Post a Comment